15 Best Ladder Herb Garden Ideas
Have you ever wondered how to make the most of limited space while adding a touch of greenery to your home? Vertical gardening with ladder planters is the answer. This innovative approach not only saves space but also brings a unique aesthetic to your surroundings.

Whether you live in a bustling city or have a small yard, these designs are perfect for growing herbs and other plants. They combine functionality with creativity, allowing you to repurpose old ladders or build custom planters. The result is a cost-effective and eco-friendly solution that enhances your space.
With a variety of DIY customization options, you can create a planter that reflects your style. From painting to adding shelves, the possibilities are endless. Dive in and discover how to transform your space with these practical and beautiful ideas.
Why a Ladder Herb Garden Is Perfect for Small Spaces
Small spaces can still thrive with the right gardening solution. A vertical garden is an excellent way to maximize your planting area without sacrificing style. Unlike traditional horizontal setups, vertical planters offer up to three times more space for growing fresh herbs and other plants.
Take Jen’s experience, for example. She built a cedar planter for just $20 using fence pickets. This DIY project not only saved money but also created a functional and beautiful herb garden. The design included drainage holes to ensure healthy plant growth, making it ideal for both herbs and flowers.
Another advantage is weight distribution. Vertical planters are safer for balconies and patios because they spread the load evenly. A 5-tier planter, for instance, can be used both indoors and outdoors, offering flexibility for any space.
Finally, vertical gardens improve air circulation around plants. This helps prevent mold and promotes healthier growth. Whether you’re growing herbs or flowers, a ladder planter is a smart and stylish choice for small spaces.
Drape Herbs From Your Shed for Rustic Charm
Add rustic elegance to your outdoor space by hanging herbs from your shed. This simple yet effective design not only saves space but also adds a natural, cozy vibe to your backyard. Whether you’re a seasoned gardener or a beginner, this project is easy to tackle and highly rewarding.

Using fabric planters or burlap pockets, you can create a stunning vertical display. These lightweight options are perfect for attaching to your shed’s wall without causing damage. Plus, they’re customizable, allowing you to grow a variety of herbs that suit your needs.
How to Hang Fabric Planters
Start by choosing durable materials like burlap or felt. Cut them into pockets and sew the edges to create a sturdy design. Ensure each pocket has drainage holes to keep your plants healthy.
Use vinyl siding clips or hooks to attach the pockets to your shed. These clips are easy to install and won’t damage the structure. For wooden walls, opt for lightweight planters to avoid overloading the material.
Best Herbs for Vertical Growth
When selecting herbs, choose varieties that thrive in vertical setups. Thyme, oregano, and creeping rosemary are excellent choices. These drought-tolerant plants require minimal care and adapt well to hanging planters.
For seasonal maintenance, check the planters regularly for wear and tear. Replace any damaged pockets and ensure the herbs have enough sunlight and water. With proper care, your shed will become a lush, green focal point in your outdoor space.
Label Your Herbs with Creative Wooden Spoons
Personalize your herb garden with creative and functional wooden spoon markers. This DIY project not only adds a rustic touch but also helps you keep track of your plants. Using wooden spoons is a sustainable way to repurpose old kitchen utensils while enhancing your garden’s aesthetic.

Start by selecting vintage or unused spoons. Clean them thoroughly and decide on your labeling method. You can use chalkboard paint for a customizable look or engrave the names for a more permanent solution. Both options offer inspired charm and blend seamlessly with various garden themes.
To ensure durability, apply a weatherproof sealant. This protects the spoons from rain and sun, keeping them functional for years. If you choose chalkboard paint, add a protective coat to prevent fading. For engraved labels, a clear varnish works well to preserve the wood.
Here’s a quick comparison of labeling methods:
| Method | Durability | Customization |
|---|---|---|
| Chalkboard Paint | Moderate (requires resealing) | High (easily changeable) |
| Engraved Labels | High (long-lasting) | Low (permanent) |
When placing your markers, ensure they are visible without overshadowing the plants. Position them at the base of each herb or along the edge of the planter. This keeps your garden organized while maintaining its natural beauty.
Whether you prefer a farmhouse or modern theme, wooden spoon markers are a versatile and stylish addition to any garden. Try this simple project today and enjoy a more personalized and functional space.
Raised Crate Planters for Beginners
Looking for a simple yet effective way to start your gardening journey? Raised crate planters are a beginner-friendly solution that combines functionality with style. These planters are perfect for your backyard, offering an easy way to grow herbs and other plants without requiring extensive gardening experience.

Choosing the Right Crate Size
When selecting a crate, consider the size of your plants and their root depth. Standard crates are often 4’ wide x 3’ deep, but smaller options like 2’ wide x 1’ deep work well for herbs. Modified milk crates are lightweight and durable, while wooden wine boxes add a rustic charm. Here’s a quick comparison:
| Type | Pros | Cons |
|---|---|---|
| Milk Crate | Lightweight, durable | Limited aesthetic appeal |
| Wooden Wine Box | Rustic look, eco-friendly | Requires maintenance |
Soil and Drainage Tips
Proper drainage is essential for healthy plants. Start by layering gravel at the bottom of your planter. Add landscape fabric to prevent soil from washing away. Use a soil mix ratio of 60% potting soil, 30% compost, and 10% sand for optimal growth.
To prevent wood rot, treat your crate with linseed oil. This simple step extends the life of your planter, making it a long-lasting addition to your outdoor space. With these tips, you’ll have a thriving garden in no time!
DIY Custom Ladder Planter with Farmhouse Flair
Bring a touch of farmhouse charm to your home with a custom-built cedar planter. This DIY project is perfect for adding rustic elegance to your outdoor space while keeping it functional. With just a few materials and some creativity, you can create a stunning vertical display for your plants.

Start by gathering your supplies: 8 cedar pickets, exterior screws, and a staple gun. These materials are easy to find and affordable, making this project accessible for beginners. Use a miter saw to make precise 15-degree angled cuts, ensuring a professional finish.
Next, assemble the planter by constructing the box and attaching the frame. This step is straightforward but requires attention to detail. Secure the pieces with exterior screws for durability. Once the structure is complete, use a staple gun to reinforce the joints.
To protect your planter from the elements, apply an outdoor-grade sealant. This step is crucial for ensuring your ladder planter lasts for years. For a personalized touch, consider adding a sign inspired by Alice & Lois. This small addition can elevate the design and make it uniquely yours.
This project is not only practical but also a fun way to express your creativity. Whether you’re growing herbs or flowers, this farmhouse-inspired planter will add character to any space. Try it today and enjoy the satisfaction of building something beautiful with your own hands.
Brighten Your Garden with Colorful Pots
Transform your outdoor space with a splash of color using vibrant pots. These containers not only add a lively touch but also enhance the overall look of your garden. Whether you’re growing fresh herbs or decorative plants, colorful pots can bring inspired charm to any setting.

Understanding color psychology can help you choose the right shades. Yellows and oranges bring energy, while blues and greens create a calming effect. Pair these colors with your home’s trim or flower beds for a cohesive design.
For outdoor durability, opt for UV-resistant paint brands. These ensure your pots retain their vibrant hues even under harsh sunlight. Here are some tips to get started:
- Coordinate pot colors with your house’s exterior or garden theme.
- Group pots in clusters of complementary colors for visual impact.
- Experiment with lightweight resin for easy rearrangement.
When selecting materials, consider the weight. Lightweight resin is ideal for flexibility, while terracotta offers a classic appeal. Both options provide unique benefits, so choose based on your needs.
With these ideas, you can create a stunning display that brightens your garden and reflects your personal style. Start today and enjoy the vibrant transformation!
Repurpose Old Containers into Herb Planters
Give new life to unused items by turning them into stylish herb planters. Upcycling is a creative and eco-friendly way to add greenery to your home. From buckets to crates, these DIY projects are both functional and visually appealing.

Upcycling Buckets and Crates
Old buckets and crates make excellent planters. For a rustic look, try vintage tool buckets. Modern crates, like wooden wine boxes, offer a clean, contemporary aesthetic. Here’s how to choose the right container:
- Avoid treated wood or chemical containers for safety.
- Opt for materials like untreated wood, metal, or food-grade plastic.
- Group mismatched containers for a cohesive, eclectic display.
Drilling Drainage Holes
Proper drainage is essential for healthy plants. Use the right drill bit size for your container:
- For plastic, a 1/4-inch bit works well.
- For metal, use a carbide-tipped bit to avoid damage.
Place holes evenly at the bottom to prevent waterlogging. This simple step ensures your herbs thrive.
For a unique touch, consider transforming pastel lotion bottles into charming jars. These small projects are perfect for adding personality to your space. With a little creativity, you can turn everyday items into beautiful, functional planters.
Line Your Patio with Crate Herb Gardens
Transform your patio into a lush green retreat with crate planters. These versatile wooden boxes are perfect for creating a functional and stylish herb display. Whether you have a small backyard or a spacious outdoor area, crate gardens add charm and practicality.

Start by weatherproofing your crates. Apply outdoor polyurethane to protect the wood from moisture and sun damage. This step ensures your planters last for years, even in harsh weather conditions.
For added flexibility, consider a sliding crate system. This allows you to rearrange your garden seasonally. Move sun-loving herbs to brighter spots or shade-tolerant plants to cooler areas with ease.
Interplanting herbs with edible flowers is another great idea. Pair basil with marigolds or thyme with pansies. This combination not only looks beautiful but also attracts pollinators to your patio.
Enhance your setup with night lighting. Here’s a quick comparison of solar and LED options:
| Type | Pros | Cons |
|---|---|---|
| Solar | Eco-friendly, no wiring | Less reliable in cloudy weather |
| LED | Bright, consistent light | Requires power source |
Finally, include pest deterrent plants like lavender and mint. These herbs naturally repel insects, keeping your box garden healthy and thriving. With these tips, your patio will become a vibrant and functional outdoor oasis.
Herb Coffee Table for Outdoor Dining
Elevate your outdoor dining experience with a functional and stylish herb coffee table. This innovative piece of furniture combines practicality with beauty, making it a perfect addition to your home or patio. Imagine having fresh herbs at your fingertips while enjoying meals outdoors.
Convertible designs with lift-top planters are a game-changer. These tables allow you to grow herbs like basil, parsley, and chives while providing a flat surface for dining. When not in use, simply lift the top to access your herb garden for pruning or harvesting.

Waterproofing is essential for durability. Compare epoxy resin and glass tops for your table surface:
| Material | Pros | Cons |
|---|---|---|
| Epoxy Resin | Durable, customizable | Requires careful application |
| Glass Tops | Sleek, easy to clean | Can crack under pressure |
Choosing the right herbs is crucial. Basil, parsley, and chives thrive at table height and are perfect for your kitchen needs. Ensure they receive adequate sunlight and water for healthy growth.
For convenience, consider an integrated irrigation system. This DIY feature ensures your herbs stay hydrated without constant attention. Use drip irrigation or self-watering pots for efficiency.
Finally, make your herb coffee table social media-worthy. Arrange herbs in visually appealing patterns and add decorative elements like fairy lights or small ornaments. This not only enhances the look but also makes it a conversation starter.
With these tips, you can create a stunning and functional herb coffee table that transforms your outdoor dining space. Enjoy the blend of nature and practicality in your home today!
Windowsill Herb Gardens for Instant Access
Want fresh herbs within arm’s reach? A windowsill setup is the answer. This simple yet effective solution brings the convenience of growing herbs right into your kitchen. Whether you’re a seasoned gardener or a beginner, a windowsill garden is a low-maintenance way to plant herbs and enjoy their flavors daily.

Building a Plywood Planter
Creating a custom plywood planter is a beginner-friendly DIY project. Start by measuring your windowsill to ensure a perfect fit. Double-hung windows may require a deeper planter, while casement windows work better with a narrower design. Use untreated wood for safety and durability.
For food-safe finishes, consider beeswax or mineral oil. These treatments protect the wood without introducing harmful chemicals. Add a drip tray to prevent water damage to your sill. This simple addition keeps your setup clean and functional.
Choosing the Right Herbs
The direction your window faces plays a role in herb selection. South-facing windows receive ample sunlight, making them ideal for basil, rosemary, and thyme. North-facing windows suit shade-tolerant herbs like mint and parsley.
Follow The DIY Playbook’s low-maintenance approach for hassle-free gardening. Water your herbs sparingly and ensure proper drainage to avoid root rot. With these tips, your windowsill garden will thrive and provide fresh herbs year-round.
Hang Metal Planters on Your Home’s Siding
Looking to add greenery without taking up floor space? Hanging planters on your home’s siding is a smart solution. This approach not only saves space but also enhances your home’s exterior with a touch of nature.

Using a vinyl clip system, like the one from Bless’er House, makes installation easy and secure. These clips attach directly to your siding without causing damage, ensuring your wall remains intact. The system also allows for quick adjustments, making it perfect for seasonal changes.
When choosing planters, consider the material. Aluminum is lightweight and rust-resistant, while galvanized steel offers unmatched durability. Both options are ideal for outdoor use and can withstand various weather conditions.
To protect your siding, use rubberized brackets. These prevent scratches and provide a secure hold for your hanging planters. This small addition ensures your home stays pristine while showcasing your plants.
For year-round interest, rotate your planters seasonally. In spring, opt for vibrant flowers like petunias. During fall, switch to ornamental kale or pansies. This keeps your side garden fresh and appealing throughout the year.
Complement your display with trailing plants like nasturtiums or sweet potato vine. These add texture and depth, creating a lush, cascading effect. Pair them with upright plants for a balanced and visually stunning arrangement.
With these tips, you can transform your home’s exterior into a green oasis. Start today and enjoy the beauty and functionality of hanging planters on your siding!
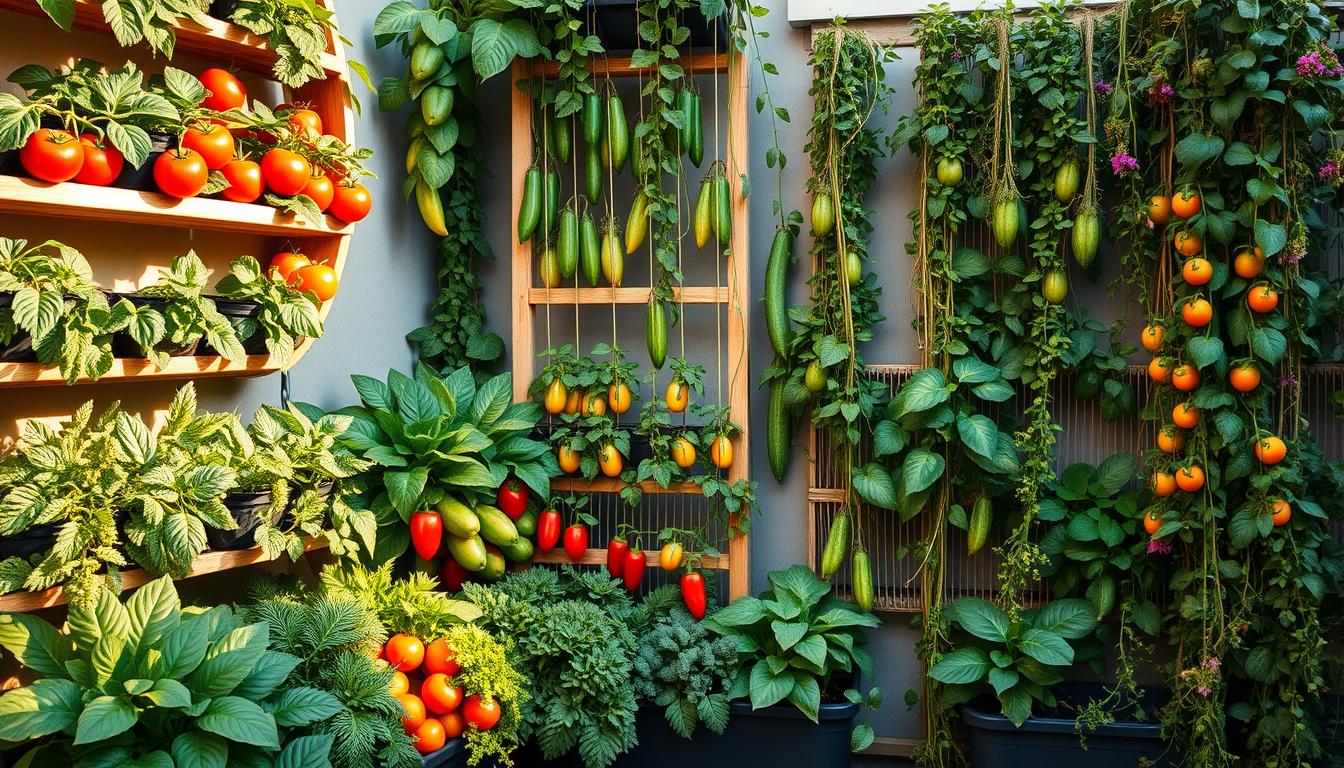
Double-Decker Ladder Planters for Maximum Yield
Maximize your planting area with a double-decker design that combines style and efficiency. This ladder planter setup is perfect for those looking to grow more in limited space. By stacking planters vertically, you can double your yield without sacrificing aesthetics.

Start by reinforcing the structure for stability. Use rot-resistant cedar boards for the supports, legs, and planter boxes. This ensures durability and longevity, even in outdoor conditions. Precise measurements and secure joining techniques are key to a sturdy build.
Companion planting is a great way to optimize your vertical garden. Pair tomatoes with basil or marigolds with peppers. These combinations not only save space but also promote healthier growth by deterring pests and improving soil nutrients.
For even sun exposure, consider a rotating system. This allows all plants to receive adequate light, ensuring balanced growth. A simple turntable base can make this feature easy to implement.
When choosing materials, pay attention to weight-bearing capacity. Cedar is lightweight yet strong, making it ideal for double-decker setups. Stephen Karlisch’s wall-mounted example demonstrates how to secure the planter for added stability.
Finally, separate plants with different water needs to optimize growth. Place thirstier varieties on the lower tier and drought-tolerant ones above. This simple tip ensures each plant thrives in its ideal environment.
With these strategies, your double-decker ladder planter will become a productive and beautiful addition to your home. Start building today and enjoy the benefits of a vertical garden that maximizes yield and style.
Suspend Herbs Overhead in Hanging Planters
Elevate your space by suspending herbs overhead in stylish hanging planters. This approach not only saves floor space but also adds a unique aesthetic to your kitchen or outdoor area. Whether you’re a seasoned gardener or a beginner, this method is both functional and visually appealing.
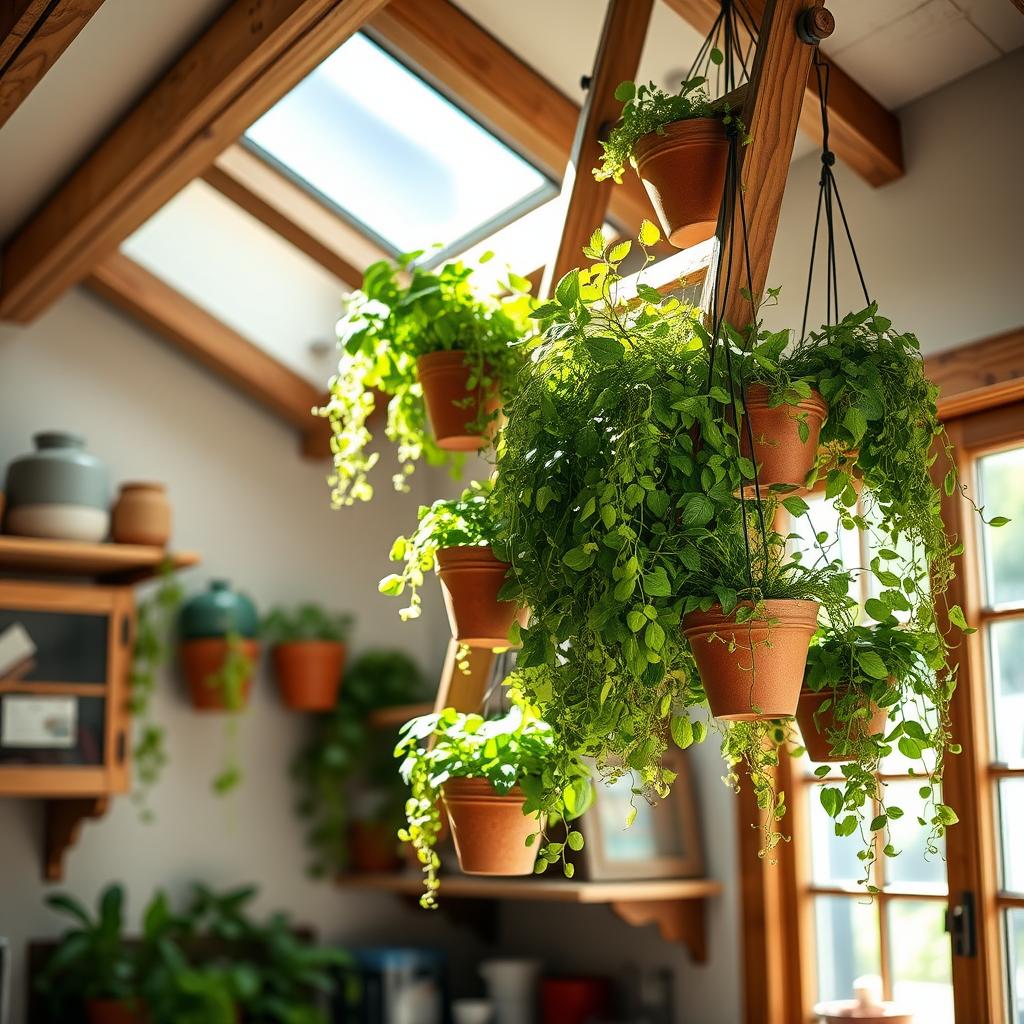
When choosing a system, consider the pros and cons of macramé hangers versus pulley systems. Macramé hangers add a bohemian touch and are easy to install, while pulley systems offer adjustable heights for better accessibility. Both options are great for growing fresh herbs and other plants.
Transitioning potted herbs between indoor and outdoor spaces is simple with hanging planters. Move them to sunny spots during the day and bring them inside at night to protect them from cooler temperatures. This flexibility ensures your herbs thrive year-round.
For cooking accessibility, hang your planters at a safe height. Aim for a level that’s easy to reach but doesn’t interfere with daily activities. This ensures you can quickly snip fresh herbs while preparing meals.
Automate watering with drip irrigation systems. These setups keep your plants hydrated without constant attention, making them ideal for busy lifestyles. Plus, they reduce the risk of overwatering, which can harm your herbs.
Finally, aerial placement naturally deters pests. By keeping your hanging planters off the ground, you minimize the risk of insects damaging your plants. This simple step helps maintain a healthy and thriving herb display.
Vintage Tin Can Herb Garden
Turn everyday tin cans into charming planters for a vintage-inspired herb display. This DIY project is perfect for adding a rustic touch to your home while repurposing items you already have. With a little creativity, you can create a functional and stylish herb garden that’s both eco-friendly and budget-friendly.

Start by cleaning and preparing your tin cans. Remove any labels and wash them thoroughly to ensure they’re safe for planting. Use a drill to create drainage holes at the bottom of each can. This step is crucial for healthy plant growth.
To prevent rust, apply a clear coat spray to the exterior of the cans. This protective layer not only extends the life of your planters but also adds a polished finish. For a vintage look, consider painting the cans in soft pastel colors or metallic shades.
Reproduce vintage labels for an authentic touch. Use printable templates or hand-paint the labels for a personalized style. Attach them to the cans with glue or mod podge for a durable finish. This small detail can elevate the overall aesthetic of your herb garden.
Group your tin cans in eclectic displays for maximum visual impact. Arrange them on a windowsill, hang them on a wall, or place them on a tiered shelf. Mixing different sizes and colors creates a dynamic and eye-catching arrangement.
This family-friendly project is a great way to involve kids in gardening. Let them paint the cans or help plant the herbs. It’s a fun and educational activity that encourages creativity and sustainability.
With these simple steps, you can transform ordinary tin cans into a beautiful and functional herb garden. Enjoy the blend of vintage charm and modern functionality in your home today!
Space-Saving Mason Jar Herb Gardens
Looking for a creative way to grow herbs in tight spaces? Mason jars are your answer. These versatile containers not only save space but also add a charming touch to your kitchen or windowsill. With a few simple steps, you can create a thriving herb garden that’s both functional and stylish.
Start by choosing the right herbs for your mason jars. Basil, parsley, and mint are excellent choices for confined spaces. Use root pruning techniques to ensure healthy growth. Trim the roots every few weeks to prevent overcrowding and promote strong, vibrant plants.

For a decorative touch, add sealing wax to the jar rims. This not only enhances the look but also protects the edges from chipping. Choose colors that match your kitchen décor for a cohesive design.
Magnetic jar gardens are perfect for fridge-side growing. Attach small magnets to the jars and place them on your refrigerator. This innovative setup keeps your herbs within easy reach while saving countertop space.
To ensure proper hydration, use water level indicators. These simple tools help you monitor moisture levels, preventing overwatering or underwatering. Here’s a quick comparison of popular indicators:
| Type | Pros | Cons |
|---|---|---|
| Plastic Sticks | Affordable, easy to use | Less durable |
| Glass Tubes | Stylish, long-lasting | More expensive |
For a minimalist approach, follow jatrax’s tips. Use clear jars and simple labels to create a clean, modern look. This style is perfect for small spaces and adds a touch of elegance to any room.
With these ideas, you can transform ordinary mason jars into a beautiful and functional herb garden. Start today and enjoy the convenience of fresh herbs right at your fingertips!
Transform a Ladder into a Vertical Herb Garden
Discover how to repurpose a simple ladder into a stunning vertical garden. This DIY project is perfect for maximizing space while adding a touch of greenery to your home. Whether you’re a beginner or an experienced gardener, this guide will walk you through the steps to create a functional and beautiful setup.

Cedar Ladder DIY Steps
Start by choosing the right materials. Cedar is an excellent option due to its durability and resistance to weather. It’s also lightweight, making it easy to move around. If you’re on a budget, consider reclaimed ladders, but ensure they’re sturdy enough to hold planters.
For new builds, use cedar fence pickets. Cut them to size and assemble the planter boxes using a staple gun. Add drainage holes at the bottom to prevent waterlogging. This simple step ensures your plants stay healthy and thrive.
Planting Tips for Tiered Growth
When planting, consider the sunlight needs of your herbs. Place sun-loving varieties like basil and rosemary on the top tiers. This ensures they receive maximum light. For lower tiers, choose herbs like mint or parsley that tolerate partial shade.
Seasonal maintenance is key to a thriving garden. Regularly check for drainage issues and prune your plants to encourage growth. With proper care, your vertical garden will provide fresh herbs year-round.
Ready to Build Your Dream Ladder Herb Garden?
Ready to bring your vision to life with a custom vertical setup? Whether you choose a DIY approach or opt for pre-made systems, this project is both rewarding and cost-effective. Compare final costs to find the best fit for your budget.
Connect with local gardening communities for tips and inspiration. These groups can offer valuable advice and support as you build your setup. Keep a progress journal to track growth and troubleshoot common issues like pests or drainage.
Share your results on social media to inspire others. A well-documented herb garden can spark creativity and encourage more people to try their hand at vertical gardening. Now’s the perfect time to start and enjoy the benefits of fresh herbs at home!
Leave a Reply